Nginx + php-fpm(fastcgi) with mysql支持的安装
环 境: rhel5.5 64bit
相关软件包:
    nginx-0.8.54.tar.gz
    php-5.2.8.tar.gz
    php-5.2.8-fpm-0.5.10.diff.gz
    pcre-devel-6.6-2.el5_1.7.rpm (安装nginx的依赖包)
本文使用用户nginx来安装软件(rpm的需要使用root用户rpm安装)
建立用户nginx,并设置密码
root# useradd -d /home/nginx -m -s /bin/bash nginx将相关.gz文件包传到nginx家目录下的soft目录下
1.php-fpm的安装,在soft目录下
  nginx% tar -xzvf php-5.2.8.tar.gz                      (解压包php-5.2.8,将生成目录php-5.2.8)
  nginx% gunzip php-5.2.8-fpm-0.5.10.diff.gz     (解压包php-5.2.8-fpm-0.5.10.diff)
  nginx% patch -d php-5.2.8 -p1 < php-5.2.8-fpm-0.5.10.diff (给php-5.2.8的源码打上fpm补丁)

  nginx% cd php-5.2.8
注意:在编译前需要使用环境变量LDFLAGS=-L/usr/lib64/mysql生效,原因是由于当前的mysql是64位的,位于不是默认的/usr/lib/mysql,否则会出现以下错误信息
  checking for mysql_close in -lmysqlclient... no
  checking for mysql_error in -lmysqlclient... no
  configure: error: mysql configure failed. Please check config.log for more information.
nginx% export LDFLAGS=-L/usr/lib64/mysql
nginx% ./configure \
--prefix=/home/nginx/php \
--enable-fastcgi \
--enable-fpm \
--with-mysql \
--with-zlib (配置php-fpm,指定--prefix,指定--with-mysql和--with-zlib)
nginx% make all (编译所有)
nginx% make install (编译安装,完成安装)检查安装
  nginx% cd /home/nginx/php/bin
  nginx% ./php -v                                (显示如下内容,表示安装正常)
    PHP 5.2.8 (cli) (built: Aug 11 2009 22:53:04)
    Copyright (c) 1997-2008 The PHP Group
    Zend Engine v2.2.0, Copyright (c) 1998-2008 Zend Technologies
将php-5.2.8目录下的php.ini-dist 复制到/home/nginx/php/lib/php.ini
启动php-fpm
nginx% /home/nginx/php/sbin/php-fpm start2.nginx的安装
  nginx% tar -xzvf nginx-0.8.54.tar.gz           (解压缩包nginx-0.8.54,生成目录nginx-0.8.54)
  nginx% cd nginx-0.8.54
  nginx% ./configure \
    --prefix=/home/nginx                        (指定--prefixm,配置前,应先安装好pcre-devel)

  nginx% make                                   (编译)
  nginx% make install                           (编译安装)
配置nginx
修改/home/nginx/conf/nginx.conf 配置文件,需做如下修改
      server {
        listen       8080;      (修改所使用的端口)
        server_name  localhost; (修改所使用的服务器名,可以使用IP地址)

  # pass the PHP scripts to FastCGI server listening on 127.0.0.1:9000
  #
  location ~ \.php$ {
    root           html;
    fastcgi_pass   127.0.0.1:9000;
    fastcgi_index  index.php;
    fastcgi_param  SCRIPT_FILENAME   $document_root$fastcgi_script_name;
    include        fastcgi_params;
  }
取消FastCGI server部分location的注释,并要注意fastcgi_param行的参数,$fastcgi_script_name 应改为$document_root$fastcgi_script_name,或者使用绝对路径
完成配置后启动
nginx% /home/nginx/sbin/nginx编写个phpinfo.php文件保存在/home/nginx/html/目录下,文件内容如下
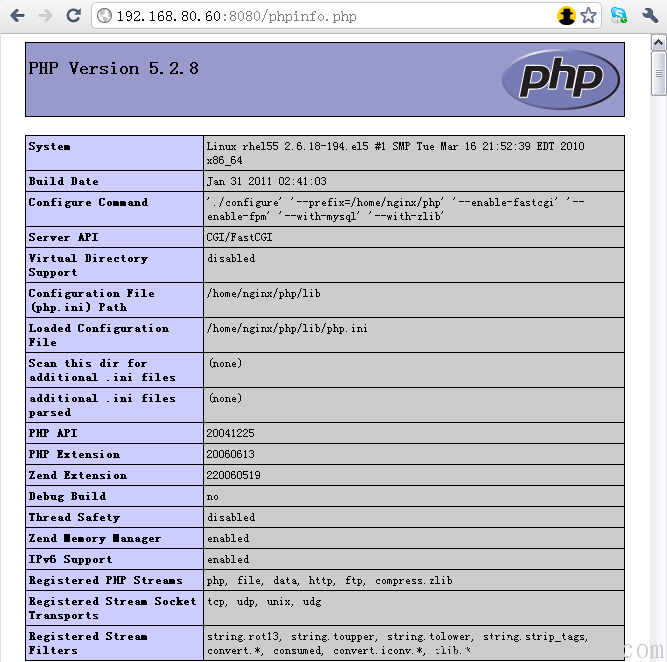
<?php phpinfo(); ?>可通过 http://127.0.0.1:8080/phpinfo.php 访问到php信息页,应该有mysql项,表明安装成功. 
为了安装phpmyadmin,还需要libmcrypt。
这里libmcrypt也使用rpm方式安装好,所需要的libmcrypt的最低版本是2.5.6,这里使用2.5.7版本,并且需要注册的时同样是必须64位的版本
libmcrypt-2.5.7-1.2.el5.rf.x86_64.rpm
libmcrypt-devel-2.5.7-1.2.el5.rf.x86_64.rpm
然后的configure选项将变成
./configure \
--prefix=/home/nginx/php \
--enable-fastcgi \
--enable-fpm \
--with-mysql \
--with-zlib \
--with-mcrypt
剩下的步骤一样了。
